
How to Configure Vim for Writing
 Posted by Elnu on
 #programming, #writing, #vim
There are a lot of tools that are, for the most part, only used in the programming sphere that could do a lot of good if they received adoption among the wider non-technical community. Git and Markdown especially. Version control is useful to anyone who works on text files and needs to be able to revert back to a previous version, and Markdown is a simple and succinct way to format simple text documents — especially compared with Microsoft Office.
Another tool that could see wider adoption is Vim, especially among writers looking for a powerful yet minimal text editor, and are willing to invest some time into learning it.
I switched over to Vim a couple weeks ago from GNU nano and VSCodium (a free and open source build of VS Code), and I haven’t looked back since. However, out of the box, Vim isn’t configured to excel at anything, besides perhaps basic configuration file editing. In this guide, I’ll go over how to configure Vim for writing, assuming you’re writing in Markdown files.
When you’re done, your Vim will look something like this:
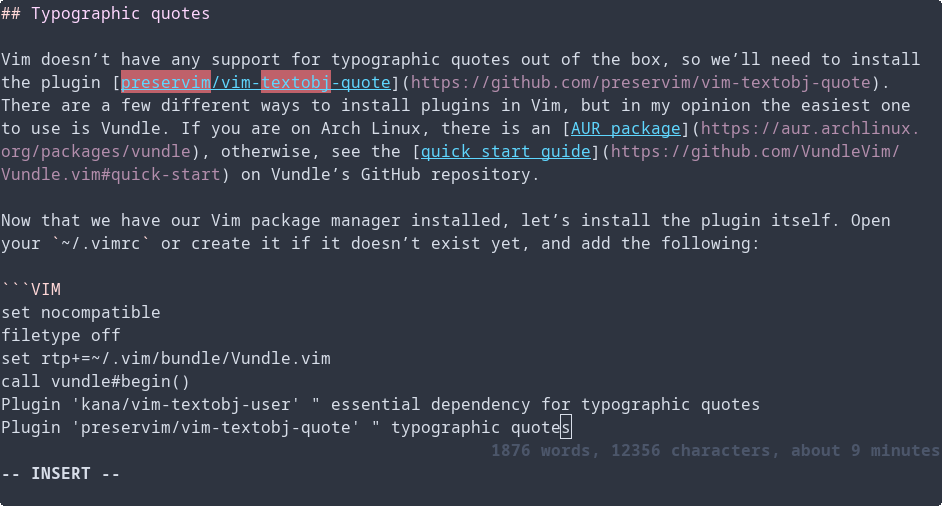
Figure 1: Screenshot
I will cover the following, assuming you are slightly familiar with basic editing in Vim:
- How to set Vim to have soft line breaks at words, not characters, so no words are split across lines
- How to use smart/typographic quotes (i.e. =“”= instead of
the standard ASCII
"") - How to enable spellcheck
- How to prevent Chinese, Japanese, and Korean (CJK) characters from being flagged as spelling mistakes
- How to patch your dictionary to include words with typographic
apostrophes (by default, words such as
doesn’twill be flagged as misspelled butdoes'twon’t be)
- How to add a custom status bar that displays word count, character count, and estimated reading time
With the introduction out of the way, let’s get right into it!
Soft line breaks
Most Vim configurations are done in the user’s
~/.vimrc file, which applies to all Vim sessions
regardless of file type. However, we want our customizations to
only apply to Markdown text files. Luckily, Vim has a feature that
handles this. Filetype
plugins allow you to create Vim configurations that only apply
to certain filetypes, and are stored in the directory
~/.vim/ftplugin/. We are going to create one for our
Markdown files: ~/.vim/ftplugin/markdown.vim.
Inside this file, add the following:
setlocal linebreakWe want to use setlocal (or its shorthand
setl) over the usual set because this
only sets linebreak on the current buffer. If we have
multiple files open in Vim, we want to make sure that this setting
only applies to open Markdown files.
Thanks to u/habamax for pointing this out!
And you’re done! Vim will now no longer split words across soft-wrapped lines. Now, let’s move on to typographic quotes.
Typographic quotes
Vim doesn’t have any native support for typographic quotes, so we’ll need to install the plugin preservim/vim-textobj-quote. There are a few different ways to install plugins in Vim, but in my opinion the easiest one to use is Vundle. If you are on Arch Linux, there is an AUR package, otherwise, see the quick start guide on Vundle’s GitHub repository.
Now that we have a package manager for Vim installed, we need to
install the plugin itself. Open your ~/.vimrc, or
create it if it doesn’t exist yet, and add the following:
filetype off
set rtp+=~/.vim/bundle/Vundle.vim
call vundle#begin()
Plugin 'kana/vim-textobj-user' " essential dependency for typographic quotes
Plugin 'preservim/vim-textobj-quote' " typographic quotes
call vundle#end()
filetype plugin indent on
If you are unfamilar with Vundle, between
vundle#begin() and vundle#end() is where
all of the Vim plugins you want installed with Vundle are listed;
the rest of the lines are various requirements for Vundle to work
properly (for more information, see Vundle’s
quick start guide). By default, Vundle assumes the plugins to
be GitHub repositories, so all you need to write down is the
repository name. kana/vim-textobj-user
is an essential dependency for our typographic quote plugin that
will handle text objects.
Now that you’ve listed the necessary plugins, you need to have
Vundle install them. Save and exit ~/.vimrc, open Vim,
type :PluginInstall, and press enter. If you’ve done
everything correctly, Vundle should pull all of the necessary
plugins from GitHub, and once it’s done you can type :q
to exit the installation window.
The typographic quotes plugin is now installed, but it won’t
start up by default. Since we only want it to run on Markdown
files, we open up ~/.vim/ftplugins/markdown.vim again
and add the following:
call textobj#quote#init()This will initialize the typographic quote plugin whenever you enter a Markdown file.
Useful commands
-
Sometimes you may want to override the plugin to type non-typographic quotes. To do this, press Ctrl + V (V for Verbatim) and then type the single or double quotation mark.
-
This plugin can also convert preexisting text to typographic quotes. There are instructions on how to do this on the plugin’s repository, but I was having some difficulty getting them to work.
I ended up slightly using a slightly modified version of the instructions which maps \c to run the plugin replacing straight quotes with typographic “curly” quotes, and \s to do the inverse. (You can replace the backslash with any character, provided it isn’t already mapped. The backslash key is handy, however, since it’s one of the few keys that isn’t connected to any commands in Vim’s default configuration.)
map \c <plug>ReplaceWithCurly
map \s <plug>ReplaceWithStraight
In normal mode, these commands replace all occurrences in the current paragraph, and in visual mode (how you do visual selection in Vim: press v while in normal mode) they replace all occurrences in the current selection. To replace throughout the entire document, Press gg to go to the top of the document, v to enter visual mode, G to jump to the last line of the document, $ to go to the last character, selecting everything, and finally either \c or \s to run the plugin command. So, altogether: ggvG$ + either \c for curly quotes or \s for straight quotes.
-
For more information and advanced usage, see the plugin’s README.
Spellcheck
To enable spellcheck, add the following to your
~/.vim/ftplugin/.markdown.md:
set spell spelllang=en
set spelllang+=cjk " prevent CJK characters from being spellchecked
Of course, if you want spellchecking in another language, change
en to whatever your language code is. The second line
is optional, however if you often work with documents including
Chinese, Japanese, or Korean (CJK) characters like me, this is
handy since otherwise Vim will mark them all as spelling
mistakes.
Useful commands
- zg adds a word to the dictionary
- z= brings a list of possible corrections for misspelled words
- zug or zuw removes a word from the dictionary
- :set nospell disables spellchecking for the current document
- :set spell enables spellchecking for the current document
Patching dictionary for typographic quotes
If you decided to skip the typographic quotes configuration from earlier, you can stop here, but otherwise we’re going to have to patch our Vim spellcheck dictionary to include words with typographic apostrophes/single quotes (e.g. =doesn’t=) which will be marked as incorrect otherwise.
This thread on the Vi and Vim Stack Exchange was very helpful, so if you’re having any trouble please refer to the two answers there.
First, create the directory ~/.vim/spell and enter
it. We’re going to need two dictionary files, which are available
here. Please check
to see if there has been a newer version on the website and
wget that instead, if the one I’m using (2020.12.07)
has become out of date. I’m going to use the American English
(setting _LANG to en_US) dictionary file,
but Canadian (en_CA) and Australian
(en_AU) English dictionaries are also available. If
you need British English or larger word list, more archive
downloads are available
here, although I haven’t tested them.
$ mkdir -p ~/.vim/spell && cd ~/.vim/spell
$ _LANG=en_US # language variable for future commands, replace if needed
$ wget http://downloads.sourceforge.net/wordlist/hunspell-$_LANG-2020.12.07.zip
$ unzip *.zip $_LANG* && rm *.zip
In order to patch the dictionary, run the following command (see this for an explanation of how it works). It takes all occurrences of words with apostrophes in the dictionary file and appends a version with the typographic version.
$ grep "'" $_LANG.dic | sed "s/'/’/g" >> $_LANG.dicThen, still in the ~/.vim/spell directory, start
Vim, and run the :mkspell! en en_US command, which
should create an en.utf-8.spl file. You’re done!
If you find more compatible dictionary files besides English that are confirmed working, please let me know and I’ll add them to this article.
Custom status bar
Now, for the cherry on top: a custom status bar!
Add the following to your
~/.vim/ftplugin/markdown.vim:
function! Characters()
      return strchars(join(getline(1, '$'), "\n"))
endfunction

function! Words()
      return wordcount().words
endfunction

function! Minutes()
      let wpm = 200
      return (Words() + wpm / 2) / wpm
endfunction

set laststatus=2 " enable status line
set statusline+=%=%{Words()}\ words,
set statusline+=\ %{Characters()}\ characters,\ about
set statusline+=\ %{Minutes()}\ minutes
" remove ugly white background
hi StatusLine ctermfg=0 ctermbg=none cterm=bold " 0 for the terminal color 0
I haven’t done any Vimscript before working on this configuration, so this is mostly cobbled this together from a few Stack Overflow threads. There might be better ways of doing some things!
The main things of note are the following:
strcharsis the only correct way to count the number of characters in a string. Many people suggest methods that count the number of bytes, but Unicode characters outside of ASCII will take up more than one byte and thus be counted as more than one character.- If you need a byte counter in your status line, you can use
wordcount().bytes. - The
%=in the firstset statusline+=line makes everything following right-aligned. - Spaces must be escaped using
\when adding to the status line. - By default, the status line background is bright white, so in
the final line
ctermbg=noneremoves this and makes it more subtle. - I didn’t want my status line to be brighter than my text and
distracting, so I set its foreground color to
0in the final line. In my terminal color palette, this is a subdued color, but you can try using any value between 0 and 15.
Conclusion
That’s all for this tutorial! I hope it was useful to you. For the last couple of weeks, I’ve been learning to use and configure Vim, and it’s been a lot of fun. I made this article to share what I’ve learned, and also as a future reference for myself. Writing can be a good way of solidifying your knowledge, and I learned a lot writing this. This is my first “proper” blog post, so I hope it was alright. I’ll be writing more in the future!
Oh, and one more bonus tip. The normal j and k navigation commands for going up or and down a line in Vim go over “hard” lines in the document, not soft-wrapped visual lines. If you want to go over visual lines as one often does when writing, prefix the command with g (for graphical, I guess?). So, for example, to go down one graphical line, use gj. You can even prefix the chord with a number to repeat it multiple times, so to go up three visual lines, use 3gk! If you need to do this a lot, you might want to look into creating a custom mapping.
See you in the next post!